
My Weekend Project
I have been wanting to get a new background for my photo studio setup. Up until last week, I only had two backgrounds. a 10'x20' black and a 10'x20' white background. I also have a roll of grey seamless (which is a great option btw, I'll go more into that in a future post). I saw a project on DIYPhotography about how to create your own background, so I decided to give it a try. I began with their suggested steps and recipe as a starting point, but I let my own imagination carry me in a slightly different direction.
Lets begin with a list of materials that I used.
1 x 9' x 21' cotton muslin clot
1 x Luggage scal
1 x box of Black Rit Dy
3 x box of Rit Purple Dye
1 x 18 gallon plastic container
Rope
String
Salt
Hot Wate (lots)
Pots to heat watet
Original muslin clot
I began my project by visiting a local cloth store. Mary Jo's has been in the area pretty much my whole life. It is so well known that I have heard of people driving from as far away as Texas to shop there. It is a large place, with thousands of bolts of cloth arrayed for one to see. I go there on occasion to be inspired and find unique scraps to uses as props or modifiers. But this time I wanted to get something specific. I wanted enough cloth to serve as a background. My cloth of choice was muslin. Muslin is the only cloth that is produced in bulk that has the width for a full sized (~10 wide) photographic background. That is why you see it so often in photography studio stores. The store I was at only had 109" (9') wide cloth, but you can find 120" (10') wide bolts if you search online. I paid about $50 for a 7 yard length of this cloth.
Once I got it home, I weighed the cloth. Looking at the Rit website, I found a recipe for their dye. For cotton cloth, they recommend 3 gallons of water, 1 cup of salt and 1 packet of dye per pound of cloth. So I needed to weigh my cloth.
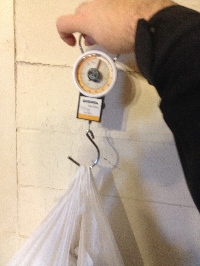
Scale with weighing my fabric
Fortunately, I have something just for that. I like going camping as well as taking photographs, so I had a hanging luggage scale so I know how much I am carrying. I dug it out and weighed my cloth. It came in at about 3 lbs. of weight. My quick calculations let me to the need for 9 gallons of water, 3 cups of salt and 3 packs of dye, if I went by the standard recipe. I knew I wanted a purple tie-dye recipe, but I also knew I didn't want a basic white cloth where the purple dye wasn't. Fortunately, Rit has a section of their website to tell you how to mix and match their dyes to produce a new color you can't buy in stores. I found a nice grey shade to be my backgrounds base color. Works out to be about 1/8th of a box of black dye per 3 gallons. That made it a bit difficult to measure, without a scale.

Grey dye mixed with salt.
I ended up estimating it at about a half a box (which would be a tad more than the called for amount) and eyeballed that, along with 3 cups of salt and 9 gallons of hot water. That was my next challenge, how do I get enough water and ensure it is at the correct temperature?

Pot with thermometer.
Using a bit of my high school science knowledg, I recall that it takes a lot of energy to boil water, but not nearly as much to heat it up. I guessed that if I got the water to 160 to 170 degrees, and kept adding water to it, it would keep the water above 140 degrees and would not take all day to heat it up either. I used an old 1 gallon water bottle to measure it, and at my wife's suggestion 2 pots to warm the water on the stove. I would heat the water, measuring the temperature with a thermometer I got to make my cappuccino with. Oddly I've never used it for that purpose. Strange how that works out sometimes.
While the water was heating, I took the muslin cloth and dumped it into the wash. Using bleach to make it more white, and regular washing detergent to strip off any thing it could have picked up at the factory, I used hot water with a cold rinse, but I didn't dry the muslin, I wanted it wet for when I placed it in the vat of dye.

Stirring the cloth into the dye.
I used a wooden dowel rod to stir the dye and salt while I add the water. When I am done heating the 9 gallons, I then add the fabric. It is quite a lot of fabric, so it is important to ensure all of the it makes contact with the dye. For this background base coat, you want to make sure all of the dye coats everything.(also worth noting is that dyeing layers your colors, so start with the lightest first, otherwise your lighter colors will disappear and only server to darken your over all dyes).
After a half an hour of stirring, I poured out the water and dumped the muslin into my washing machine. I had seen instructions on how to dye in the wash, so I figured it would be safe to wash out they let over dyes, and get it ready for the next phase. Warm water this time, with a cold rinse. No detergent or bleach, as I didn't want to remove any dye or lighten it further. Interestingly, the resulting cloth seemed to turn a purple/grey which I thought would work out very well.
One note, when pouring out the water, be sure to rinse out the sink immediately, or you could end up with a stained sink afterwards. Use hot water and bleach as recommended, or do what I did and dump it in the back yard. You may need some help for this as 9 gallons of water weigh a lot more than you would expect. 8 pounds per gallon, or 72 pounds. add in the weight of the container and cloth, and you have a heavy thing to move. Still I managed it.
Twisting and tying the cloth
While the water was heating this time, I started with my variant on the tie-dyeing process. I didn't want to use the standard method. The picture from the DIYPhotography website didn't look to be what I wanted to produce. Too splotchy, with odd symmetric circles. I wanted something more interesting. I did a few searches on youtube and found an interesting process that involved twisting the fabric and then dyeing it, giving a nice pattern that seems to wave across the fabric. Now they were doing t-shirts, I was doing something much larger, but I got my step-son to help me out and we twisted it up pretty well, with ties of string every 6" or so. I then wrapped it into a ball and tied that with some jute rope I had laying around the house.

3 boxes of Purple Dye and 3 cups of salt.

Bundled tie-dye
Since I wanted purple to be my main color for the project, I this time mixed in 3 boxes of Rit purple powder dye with 3 cups of salt (recommended to help set the dye in cotton cloth), and I started warming the water. When the water was heated and the dye mixed in, I stirred in the bundled cloth and let it mix for 15 minutes. repeating the process for getting rid of water, then washing the material to set the final product. This time, I did dry it in my dryer. i noticed in my handling of the cloth that the ends were rather rough and loose, and I would need to have it hemmed to stop it from unraveling in the future. But it did look good.
The following day, I drove over to the local mall which as a nice little sewing shop where they do custom orders. I had the hem a suit, so I thought they might be able to hem the bottom edge and then sew a sleeve along the top so that I could use it to mount on my background stand.
The end result is below. My costs for this project I estimate to be about $75 or so ($50 for the cloth, $10 for the tub though I can use it for other projects, $5 for the dye, Salt is so cheap it is negligible, and $20 for the seamstress to hem the background). I like it, and I think I will get a lot of use out of it. Two things I do think I will do differently next time is one: I don't need a 20' long background. It is nice, and works for many uses, but I may go with 5 or 6 yards next time instead of 7. And I may only need a 4-6 wide background for head shots. So I could see me getting muslin that is a bit less wide next time. But over all, it was a great project and something I look forward to doing again.
Me and my background